TL:DR; This is a garbage product created by jerks :-) Read on for a teensy bit more nuance.
The Real TL:DR in three-ish bullets:
It's actually not that garbagey of a product, but the opaqueness of it bothers me, it could be a very useful thing for admins who aren't me.
Comcast (Nominum) are either MITM'ing and changing results in flight of DNS lookups, which is super fucking irritating, or they're directing all port 53 traffic to their resolvers. Either way, that's super not great.
I need a way to open a goddamn case with my "Business" ISP without trying to explain myself in a conversation with L1 support or some chatbot. The fact that those are my only options caused me to abandon the possibility of getting help from my ISP, which is clearly why they do it this way.
This could be fixed by making it much more obvious that "SecurityEdge" is a thing and what it's doing. Also by giving users and site owners some way to feed back and get their sites delisted. It's not a "bad" product, but it's so opaque as to be useless to me, and I use similar products (Umbrella) in my real job, so I'm not exactly new to the category or how DNS works at a protocol level.
I'm sure this isn't news to anyone in the DNS security space full-time, but definitely surprised me
Comcast needs to make their Business site available on Firefox. It's embarrassing for them to require Chrome-based in a very 1996 "Built for IE 4" way.
About 3 weeks ago Natalie mentioned to me that she couldn't get to her site, and that it was blocked for "Malware and Phishing". Her site is hosted by SquareSpace, so a compromise of her site would likely impact a lot more than just her site. We've been here before and I'll come back to this in a bit.
The issue didn't only affect Natalie's SquareSpace site though, it also hit "shop.nataliecurtiss.com", which is hosted on the machine behind me, on my network, using the Comcast Business network. That page consists of a single redirect to Natalie's store on Etsy. I strongly recommend going there and buying some nesting dolls or something. So that's odd. I can categorically say that at this moment in time, "shop.nataliecurtiss.com" is not hosting a "phishing and malware" ridden garbage fire. That is subject to change, but right now, it's all clean.
So the page we're presented with is this:
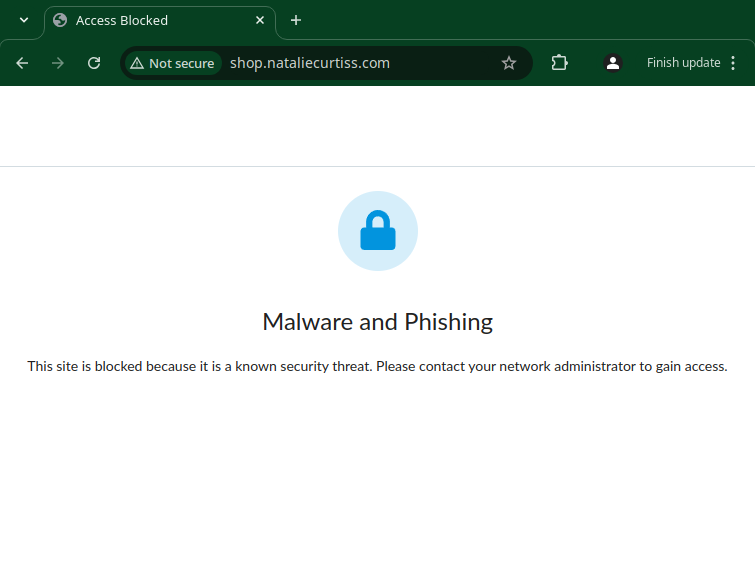
That's about as generic as they come and there's no indication of who is showing it to us and why. For the record, I do not use Comcast's DNS resolvers. Until today there has been no "real" reason for this, but Comcast specifically has a long and proud history of DNS fuckery going back to the 90s. After today I'll be taking additional steps to ensure my DNS queries aren't being "improved" by my ISP.
Looking at the source of this page though, the only indication of whose fault this is a reference to an "xfinity" font family:
body {
font-family: Xfinity, Open Sans, Arial, sans-serif;
font-size: 14px;
line-height: 22px;
font-weight: 300;
color: #212121;
display: flex;
flex-direction: column;
}
Clearly at some point, Comcast is yoinking the plaintext DNS reply I'm getting from my upstream resolvers and replacing it, directing me to their "Malware and Phishing" page.
This is easily shown with nslookup. If I do a lookup against the public DNS resolver at 4.2.2.2 for www.nataliecurtiss.com from my home workstation I get 104.225.8.28(29), but if I do the same request against the same public resolver from off-site, I get the correct CNAME record for natalie-curtiss.squarespace.com.
Home
> server 4.2.2.2
Default server: 4.2.2.2
Address: 4.2.2.2#53
> www.nataliecurtiss.com
Server: 4.2.2.2
Address: 4.2.2.2#53
Non-authoritative answer:
Name: www.nataliecurtiss.com
Address: 104.225.8.29
Name: www.nataliecurtiss.com
Address: 104.225.8.28
Name: www.nataliecurtiss.com
Address: 2607:fc50:3000:2::1b
Name: www.nataliecurtiss.com
Address: 2607:fc50:3000:2::55
Off-site
> server 4.2.2.2
Default server: 4.2.2.2
Address: 4.2.2.2#53
> www.nataliecurtiss.com
Server: 4.2.2.2
Address: 4.2.2.2#53
Non-authoritative answer:
www.nataliecurtiss.com canonical name = natalie-curtiss.squarespace.com.
Name: natalie-curtiss.squarespace.com
Address: 198.49.23.176
Name: natalie-curtiss.squarespace.com
Address: 198.49.23.177
Name: natalie-curtiss.squarespace.com
Address: 198.185.159.177
Name: natalie-curtiss.squarespace.com
Address: 198.185.159.176
104.225.8.29 is a Nominum IP that doesn't tell me a whole lot about who's paying them and why exactly but at least identifies the specific flavor of DNS fuckery that's happening here.
So I started searching around for what people do about such blocked page messages as a site admin. The simplest thing is to visit this XFinity page, select "I can't reach a website I want to go to" and request the site be unblocked. There is no positive feedback here. You get an automated "we're gonna look into and see about unblocking you, bye forever!" response. I put as much context in my More Information box as I could, that I am the owner of these domains, if there's something wrong that's causing them to be blocked I want to know so I can fix it.
I did this twice a couple of weeks apart, and as expected it had no impact. If Comcast Business had a way to open a case without sitting on hold or dealing with an in-browser chat (bot?) I would have taken that route at this point.
Only the other day did it occur to me to have other Comcast/XFinity customers test this. I had one home user and one business user test and both were able to hit the site just fine. So is it a volume thing? We hit the site a lot from here, so it trips some kind of threshold? WTAF?
Today I remembered that a couple of weeks ago when the whole "Mozilla Terms of Service" issue blew up everyone and their brother was offering alternate browser suggestions. I recall someone suggested Zen at www.zen-browser.app, and recall getting the Malware and Phishing page for that. At the time I was like "hey nice security Zen, you get a nanosecond of traction and immediately get hacked into a malware farm?". I had forgotten this by the time Natalie complained about access to nataliecurtiss.com
Today is when it all clicked in my head. Oh, hey Comcast started sending me "SecurityEdge Activity Reports" in the mail some time ago. Wonder what's up with that. So I hit my account and logged into the SecurityEdge site for the first time. It looks a whole lot like a scaled down consumery version of Cisco Umbrella. You can select various "Category" blocks and there's a "Malware and Phishing" slider that is "ON" and ghosted so you can't turn it "OFF". You can disable SecurityEdge globally, which of course is what I've done.
Looking at my stats, over the past 30 days the Dashboard claims to have blocked an impressive 692 Things:
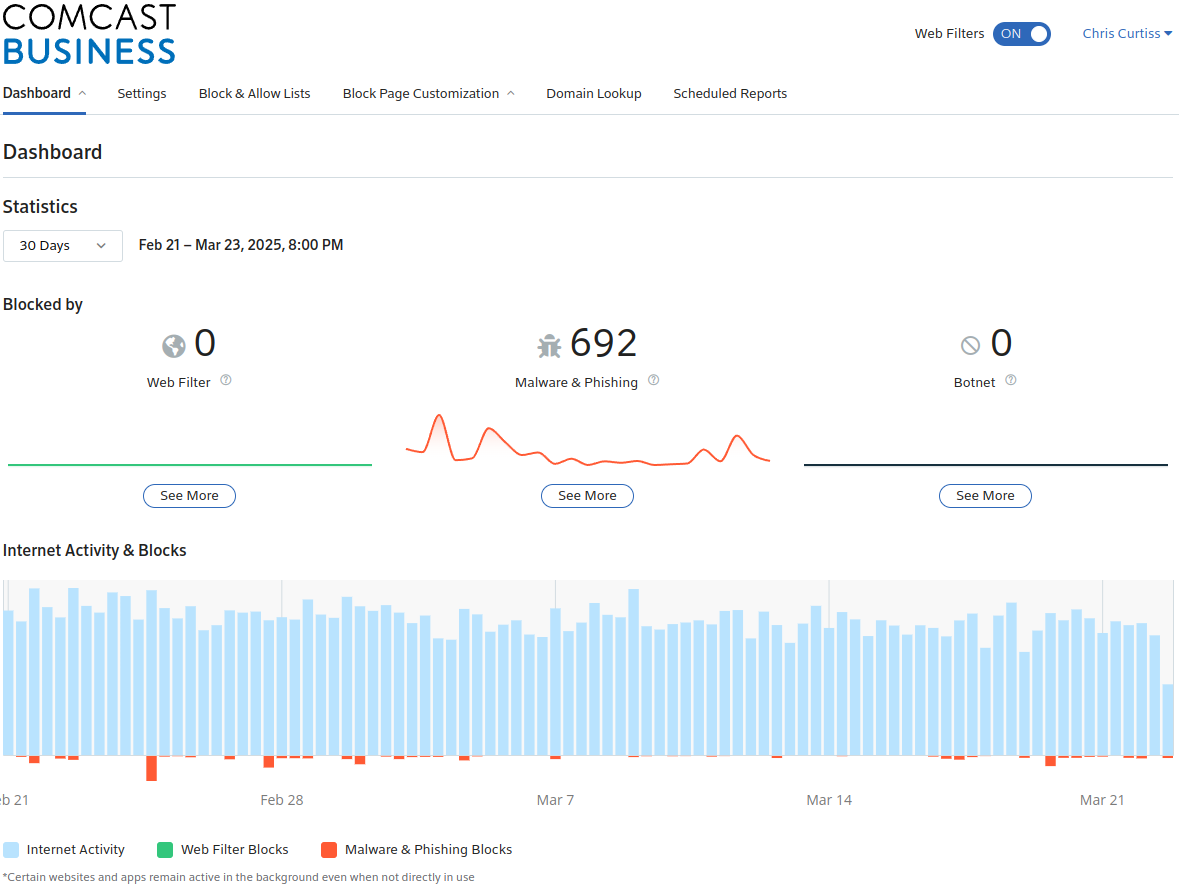
However drilling in and downloading the full csv output of all the blocks, there are only 196 rows (195 results and a header row). So whatever, I can't account for 692. There's no multiplier column that I can see, identical requests are just repeated as multiple rows. Anyway they break down like this. Here are the results for things where I know 100% are traffic I intentionally generated:
1 www.freeroms.com
7 nataliecurtiss.com
9 comms-sl-events.squarespace.info
10 yestonstore.com
16 eviltracker.net
22 shop.nataliecurtiss.com
25 zen-browser.app
69 www.nataliecurtiss.com
That's 160 of the 195 total, I removed two other heavy hitters at 16 and 20 hits each since I'm still investigating them. There are only three which either aren't related to my wife's site or the aforementioned Zen browser anomaly.
FreeRoms, because hell yeah free roms
Eviltracker.net - used by EFF to check exactly this kind of bullshit. In this case I did a run of their browser privacy test at Cover Your Tracks which I now see was a compromised test in that Comcast blocked some of their test suite.
yestonstore.com - Because just look at it
The remaining 5 results (I'd say 25, realistically) are pretty spammy looking for sure. So in the last 30 days Comcast has saved me 25 hits to domains that I don't recognize, and which were likely loading tracker pixels on sites I did visit, and "saved me from myself" 160 times.
"So what the fuck can I do about it"?
Well nothing. There's no visible mechanism to request any feedback as to /why/ something is in their block list. Either as a user, which is bad, or more importantly as someone who runs the goddamn site. On the very network the service claims to be trying to protect.
I would love to see a few things:
In the SecurityEdge product, have a link to request a review, or at least "Show me why this site is blocked".
Externally, for a site admin who doesn't also happen to be a customer, and who doesn't even more coincidentlly host that site on the Comcast Business network, provide some entry point for them to find out what is wrong with their site so they can either remedy that or otherwise explain the issue and get their shit delisted.
And I'm really shooting for the moon - A mechanism for a user of your Business product to open a ticket and receive a ticket number.
Make your goddamn site work in Firefox for the love of...
I'd say "A link on the block page itself" would be a fantastic start. Something identifying it as having been served by Comcast/XFinity would be equally fantastic. I understand it can be branded by the customer, but the default should at least identify what it's doing. If a customer chooses to "remove all Comcast branding", preferably via a checkbox in the "Customize the Block Page" UI. Making it a choice on the customization page ensures a level of understanding on the customer's part that this is something they signed up for and maintain.
I'm being very careful about saying that this was just "enabled" for me by default. I'm not ignoring the fact that I could have clicked some button one day in the Comcast Business portal and just said "yeah yeah securityedge whatever" but prior to today I'd never logged into the SecurityEdge portal and "configured" it. I don't /think/ I'm being charged extra for SecurityEdge, but I don't see why that wouldn't be the case. I mean, ISPs give away third-party enterprise malware prevention support for free all the fuckin' time right?
Every enterprise ISP I use except Comcast offers such a feature in their dashboard via your choice of "open a case" button or an email address. I don't want to "chat with support". I don't want to call in and speak to a human being. I can explain my technical issue very well in email or the constraints of a 4000 character limit text dialog. Had I that opportunity a month ago, it would have boiled down to:
I can't reach multiple sites I own, one of which is hosted on the Comcast Business network 6 feet away from me. Something is interfering with my DNS lookups and returning a result that takes me to some "malware and phishing" page. Here is nslookup output:
... copy/paste from above ...
I have three questions:
- Why is this happening
- How do I make it stop
- How do I as the administrator of these sites fix whatever is making you think they're hosting phishing and malware requests so other users aren't being blocked from my sites
As to the root cause, since this fixes it for me, but other people will likely still be blocked... Why is Natalie's site blocked for Malware and Phishing? If I had to guess it's because of this. 12 years ago Natalie's site was one of a couple hundred target domains in a malware attack. What they were doing was spamming cookies at massive scale, presumably trying to match the session cookie of an admin of the site.
Because of that attack, I've seen her site blocked for such things before, with that malware being cited as the "reason". Of course the script responsible for adding her domain to the list doesn't understand the nuance of the matter that her domain was the "victim" of the malware and not the "generator" of the malware. It just sees "malware + domain = block". I'm giving humanity a pass here that I really shouldn't. Human beings are just this stupid as well.